A strong competitor to these platforms is Microsoft Teams, which offers online chat, video calling, and collaboration tools. It integrates well with the Microsoft Office platform, but if you’re already using Slack, Zoom, or other competitors, you may not need Teams at all. Unfortunately, Microsoft Teams has a habit of launching automatically on your PC when you don’t need it. If you don’t need Microsoft Teams, you may wish to disable or uninstall it—here’s how.
How to Disable Microsoft Teams from Launching Automatically
If you want to keep Microsoft Teams on your computer, but you don’t want it to launch every time you start up Windows, then you’ll need to disable it and prevent it from launching automatically. There are a couple of ways you can do this.
Using the System Tray
Microsoft Teams has a system tray icon, found in the bottom-right corner of the Windows taskbar. You can disable it by first right-clicking this icon.
From the options menu, hover over the Settings sub-menu. From here, click to enable the Do not auto-start Teams option.
With this option selected, Microsoft Teams will no longer start automatically when you boot up your PC.
Using the Windows Settings Menu
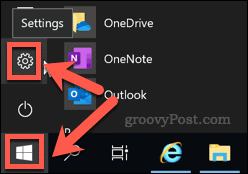
You can also disable Microsoft Teams from the startup options menu in Windows Settings. You can access this by clicking the Start menu icon. In the side menu on the left, click the Settings cog icon. Click Start and then on the Settings icon.
In the Windows Settings menu, click Apps > Startup.
You can also reach this same point by typing Startup in the Start menu search bar, then selecting Startup Apps from the results.
Once you’ve reached the Startup Apps options menu, click the switch next to Microsoft Teams to the Off position.
This will stop Microsoft Teams from launching when you next boot up your PC. If you want to enable this setting again later, retract the steps above, then click to toggle the switch back to the On position.
How to Completely Uninstall Microsoft Teams
It’s not an easy process to completely uninstall Microsoft Teams. Unfortunately, in some cases, uninstalling it will sometimes cause it to return. This is because you’ll need to remove two Microsoft Teams apps. The first is Microsoft Teams itself, while the other is the Teams Machine-Wide Installer, which is often used for large deployments of Microsoft Teams on corporate devices. You’ll need to remove both to prevent Microsoft Teams from being reinstalled later. If you’re trying to remove Microsoft Teams from a corporate device, make sure you have the necessary permission to remove Microsoft Teams from your PC by your system administrator. To remove Microsoft Teams from your PC, the easiest method is to use the Windows Settings menu. To do this, click Start > Settings to open the Settings menu. You can also right-click the Start menu and click Settings to do this.
In the Windows Settings menu, click Apps > Apps & features to access your list of installed software.
Scroll down until you see a list of your installed software. In the search bar above the list, type Teams.
You should get results for both Microsoft Teams and Teams Machine-Wide Installer. If the second one is missing, you’ll only need to uninstall Microsoft Teams to completely remove it. Click on the app you want to uninstall, and then click Uninstall. You’ll be asked to confirm—click the second Uninstall button to confirm.
This will complete the removal process for Microsoft Teams. If you have it installed, repeat the process for the Teams Machine-Wide Installer app. Once that app has been uninstalled, Microsoft Teams should be completely removed from your PC. It should no longer reinstall itself.
Learn More About Microsoft Teams
Before you rush to uninstall Microsoft Teams, you may wish to give it a second look. It has plenty of features that make it perfect for business communications, especially as it has as a free version available. You can even change your camera background in Microsoft Teams, allowing you to turn a crowded home into a better working environment when you’re speaking to clients.
![]()

![]()


